
A perceived lack of ‘TECH-spertise‘
One of the main reasons we find that many of our colleagues in education are a little fearful of MakerEd is they have the perception that they don’t possess the skills needed – they lack the ‘TECH-spertise’. Physical computing in particular appears to be viewed like this… but this need not be a barrier. Take for example the ‘spaghetti’ robot above? It avoids obstacles using an ultrasonic sensor module mounted on a servo so that it can look left and right and then decide the best way to go. Pretty cool… BUT our point is this. That robot was laser cut, wired up and coded by a 14 year old who two days previously had never even heard of physical computing, had no idea what an Arduino was, had never coded and had never used a laser cutter! When we say a lack of ‘TECH-spertise‘ is no barrier, we mean it! So, how DO you get started if you literally haven’t got a clue? Here’s some suggestions.
Start with Arduino then move to RaspberryPi
Start with something really, really simple! By this we mean build something that doesn’t require circuits, or writing your own code, or downloading data or talking to the internet. In short start with an Arduino ‘plug in and go’ project. Arduinos are micro-controllers that allow you to connect to sensors and/or control other devices. They are, therefore, ideal starters for MakerEd projects to get students making working devices and interacting with their environments quickly and easily. “But what about RaspberryPi?” we hear you say,”we have a bunch of those in our school“. Cooool…. RaspberryPi is a fantastic thing and we love it, but IF you’re fearful of tech in the classroom, try an Arduino first… or even a Micro:bit. Start really, really simple…
Starting with something simple – Arduino ‘plug in and go’.
They key word here is SIMPLE. So how simple are we talking about? As simple as (i) downloading and installing some free software which you can get HERE (it’s called the Arduino IDE and is where you type in or cut and paste code), (ii) plugging a sensor into sockets on an Arduino and (iii) reading off the results on your laptop or PC. If you can do this, then you can make a simple data-logger with your students for under $10. You don’t even NEED to write your own code (you can grab it from the internet or from some great books – see later) and you don’t even NEED to wire up a circuit (you can plug SOME sensors straight into the Arduino – no soldering, no breadboards, no spaghetti!). All you literally need is (i) a laptop or PC with the Arduino IDE software installed, (ii) an Arduino board (we recommend a cheap Uno copy… we find the Leonardo a little prone to dropping its connection) and (iii) a sensor to plug into your board! Of course, ultimately you’ll probably want to WRITE your own code and MAKE circuits…but we did say start SIMPLE!
THE simplest data-logger you can probably make is shown below. We start our students off on this one. It involves no more than plugging a TMP36 temperature sensor (flat-side innermost) into the holes (‘pins’) labelled A1, A2 and A3 on the Arduino board, plugging the board into your laptop or PC and typing in or cutting and pasting some simple code into the sketch window of the Arduino IDE (see below).
 +
+  = simple data-logger
So is that it? Pretty much! The only missing part of the equation is where to get the code and how to use the IDE software to upload it to your Arduino. And that’s the great part! Arduino is an opensource thing… the devices themselves are opensource and so can be freely and cheaply copied AND the code is shared across the globe and there are literally hundreds of tutorials and books out there on how to do this. What’s more they cover everything from the simple data-logger above to the most complicated thing you might ever wish to build. You really do NOT therefore need to be a ‘TECH-spert‘ in order to get started with MakerEd projects involving physical computing, beacuse there’s nothing you cannot find with a click of the mouse.
Starter kits
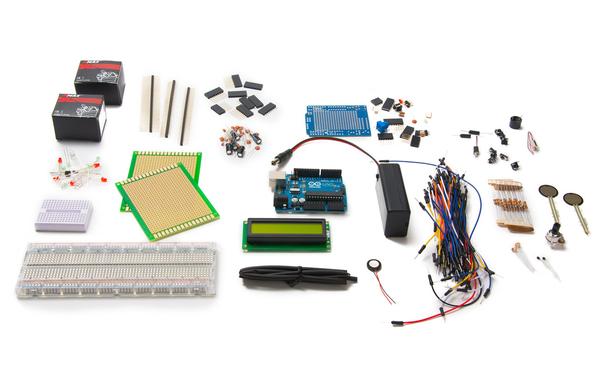 We are often asked about Starter Kits, and there are plenty on the market full of fantastic resources to get you going with Arduinos…BUT…. whilst we have found them great for tinkering with ourselves, we have found that they don’t currently fit the bill for our teaching. Why? Because they tend to contain a whole bunch of stuff that never gets used e.g. keypads, too many LEDs, LCD units (we find shields are easier for beginners to use), motors BUT just single ones (even simple robots need at least two) and assorted components that are maybe used once in a while. They’re also usually short of sensors. All this means that (i) there’s quite a bit of built in redundancy in the kits we’ve seen as far as teaching goes and so, (ii) they’re quite expensive for what they are and (iii) no starter kit contains enough of everything to cater for more than a single student at a time. So whilst they’re great for hobbyists, we’ve yet to see a really good educational starter kit that will allow groups of students to each build the same thing from a more targeted set of components. Perhaps one of the big companies could put one together? Just a thought 🙂 So for now we find buying just the components and boards we need to be the most cost effective way to embed physical computing into our MakerEd teaching. BUT… if a kit will get you making and the thought of having to source a bunch of components would put you off… get a kit(s)… to begin with 🙂
